Tips and tricks to reverting a PS4!
by skunksecond
Preamble
So before I start off this guide, I’m going to put the links of some other sources I used since my guide should not be the only one you look at if you’re doing this mod, especially if this is the first time you’re doing this. Not only will these sources be extremely useful when it comes to finding out what you need to do, but since every PS4’s motherboard is going to vary, you can see how the process changes depending on what hardware you have and what model of PS4/motherboard you have. I will also be referring to the ConsoleMods guide for the downloads and other information, so I’d highly recommend having that open while you’re doing the mod. This is also not intended to be a full guide, just some tips and tricks to doing this mod, or like an overview you can read before doing the mod.
idrees tech video guide (Using a Teensy 4.0)
Important note, this mod doesn’t allow you to downgrade your console, it only lets you swap the main PS4 firmware slot to the backup one so you can install the previously installed firmware. This lets you jailbreak your console if you were on (as of the time of writing this) 12.02 or before, or it lets you downgrade to a firmware closer to a jailbreakable firmware. Before you do the mod, open your console up and check if there is a chip that has the markings “A0X-COLX”, with X being any letter or number. If you don't have those markings on your Syscon, it isn’t compatible with the mod.
Hardware
If you don’t have soldering experience before doing this mod, don’t even bother. I have tons of hours of soldering experience and even I had some soldering related issues doing this mod. You will need experience with microsoldering as a minimum since you have to solder to the NOR.
As for the hardware, you’re going to need a decent soldering iron (a T12 soldering station or a Pinecil I'd say, even the Chinese clones of the Pinecil will do a good job at this mod) and you NEED both a fine tip and a regular tip for this mod. Obviously the basics like flux, leaded solder, wire crimps, flush cutters, and brass wool/a wet sponge to clean your tip are going to be needed, but you’ll also probably want to get a microscope if you don’t have one already. For the wires, you’ll need 28-30 AWG wire and magnet wire (i used 0.01mm but i assume anything up to 0.05mm will work), a 100-200 ohm resistor (try to get a set of varied resistors like this one, always nice to have), and dupoint wires (not required, but helpful for soldering up the UART since all you have to do is snip off one part of the wires, solder them to the board and connect them to the USB to TTL).
For the Teensy, there are 2 routes you can take. You can either buy a Chinese clone of the Teensy 2.0++ on AliExpress, or you can buy the Teensy 4.0/4.1 on Amazon or other US retailers brand new. The Teensy 2.0++ has more documentation about it since most people use it and it’s been around for longer, but since they haven’t been manufactured for a while you might end up paying a higher price for it over just buying a Teensy 4.0, and also having to wait for it to come overseas from China. The Teensy 4.0 can be found for 25-30 dollars on Amazon and ships really fast, but with the huge downside of not being able to flash the NOR with it. As far as i know, it’s possible but really difficult, so you have to use a separate USB flasher, the CH341A (with a 1.8v adapter), to flash the NOR. Those flashers unfortunately also have an issue where the power is set incorrectly on the data lines, where instead of outputting 3.3v they output 5v, so you’re gonna have to do a mod to it to force it to use 3.3v instead. I’d also highly recommend getting a USB extension cable, since that way you can keep your wires short to the Syscon and NOR but still be able to plug everything into your computer. A USB to TTL adapter like the CP210, which will help you test if the revert mod works without hooking your console up to HDMI to see if it booted into Safe Mode or not. Overall, I ended up using the Teensy 4.0 with a CH341A programmer, so this guide is mainly based on that.
Software
All of the software you need is on the ConsoleMods wiki page, but here’s the list on this guide as well.
Wee Tools: https://github.com/andy-man/ps4-wee-tools
Syscon Tools: https://github.com/AbkarinoMHM/PS4SysconTools
Norway: https://github.com/hjudges/NORway
For Norway Python 2.7.2: http://www.python.org/ftp/python/2.7.2/python-2.7.2.msi
Latest Python: https://www.python.org/downloads/
For Norway pyserial 2.5: http://pypi.python.org/packages/any/p/pyserial/pyserial-2.5.win32.exe
Putty for UART: https://www.putty.org/"
USB Programmer CH341A software for Nor read and write off/on the board: https://dwdvb.com/neoprogrammer-new-update/
HxD for file comparison: https://mh-nexus.de/en/hxd/"
Wee Tools and Syscon Tools have diagrams for pretty much every PS4 and their solder points, so make good use of them. Before you flash NOR, if you’re using the CH341A programmer be sure to install the drivers in NeoProgrammer’s files. If those error out when trying to install them, try these ones, I had a lot of problems installing the drivers but I can’t remember right now how i fixed them, sorry!
Lifting the Syscon Pin (AKA “oh shit i just broke the Syscon pins what do i do??”)
This mod requires you to lift one of the Syscon pins (pin 15 on the Slim and Pro models, pin 22 on some Fat model PS4s that have a bigger syscon). This was something I (unfortunately) completely fucked up when I was doing the mod. I ended up breaking off 2 of the syscon pins, which is one of the reasons why you NEED to be patient while you do this mod. If you break off pin 15/22, the console won’t boot at all, so it’s crucial you avoid that. Since I broke it off, I don’t feel like I'm very qualified to tell you how to lift the syscon pin, so please read the ConsoleMods wiki for the instructions on how to lift it, and also Modded Warfare’s video as well. What I can tell you, however, is how to fix it if this happens to you. You need a file, and in order to fix this if it happens to you, you need to file down the Syscon chip where the pin used to be and then solder a magnet wire down back to the pad once you expose the copper of the chip.
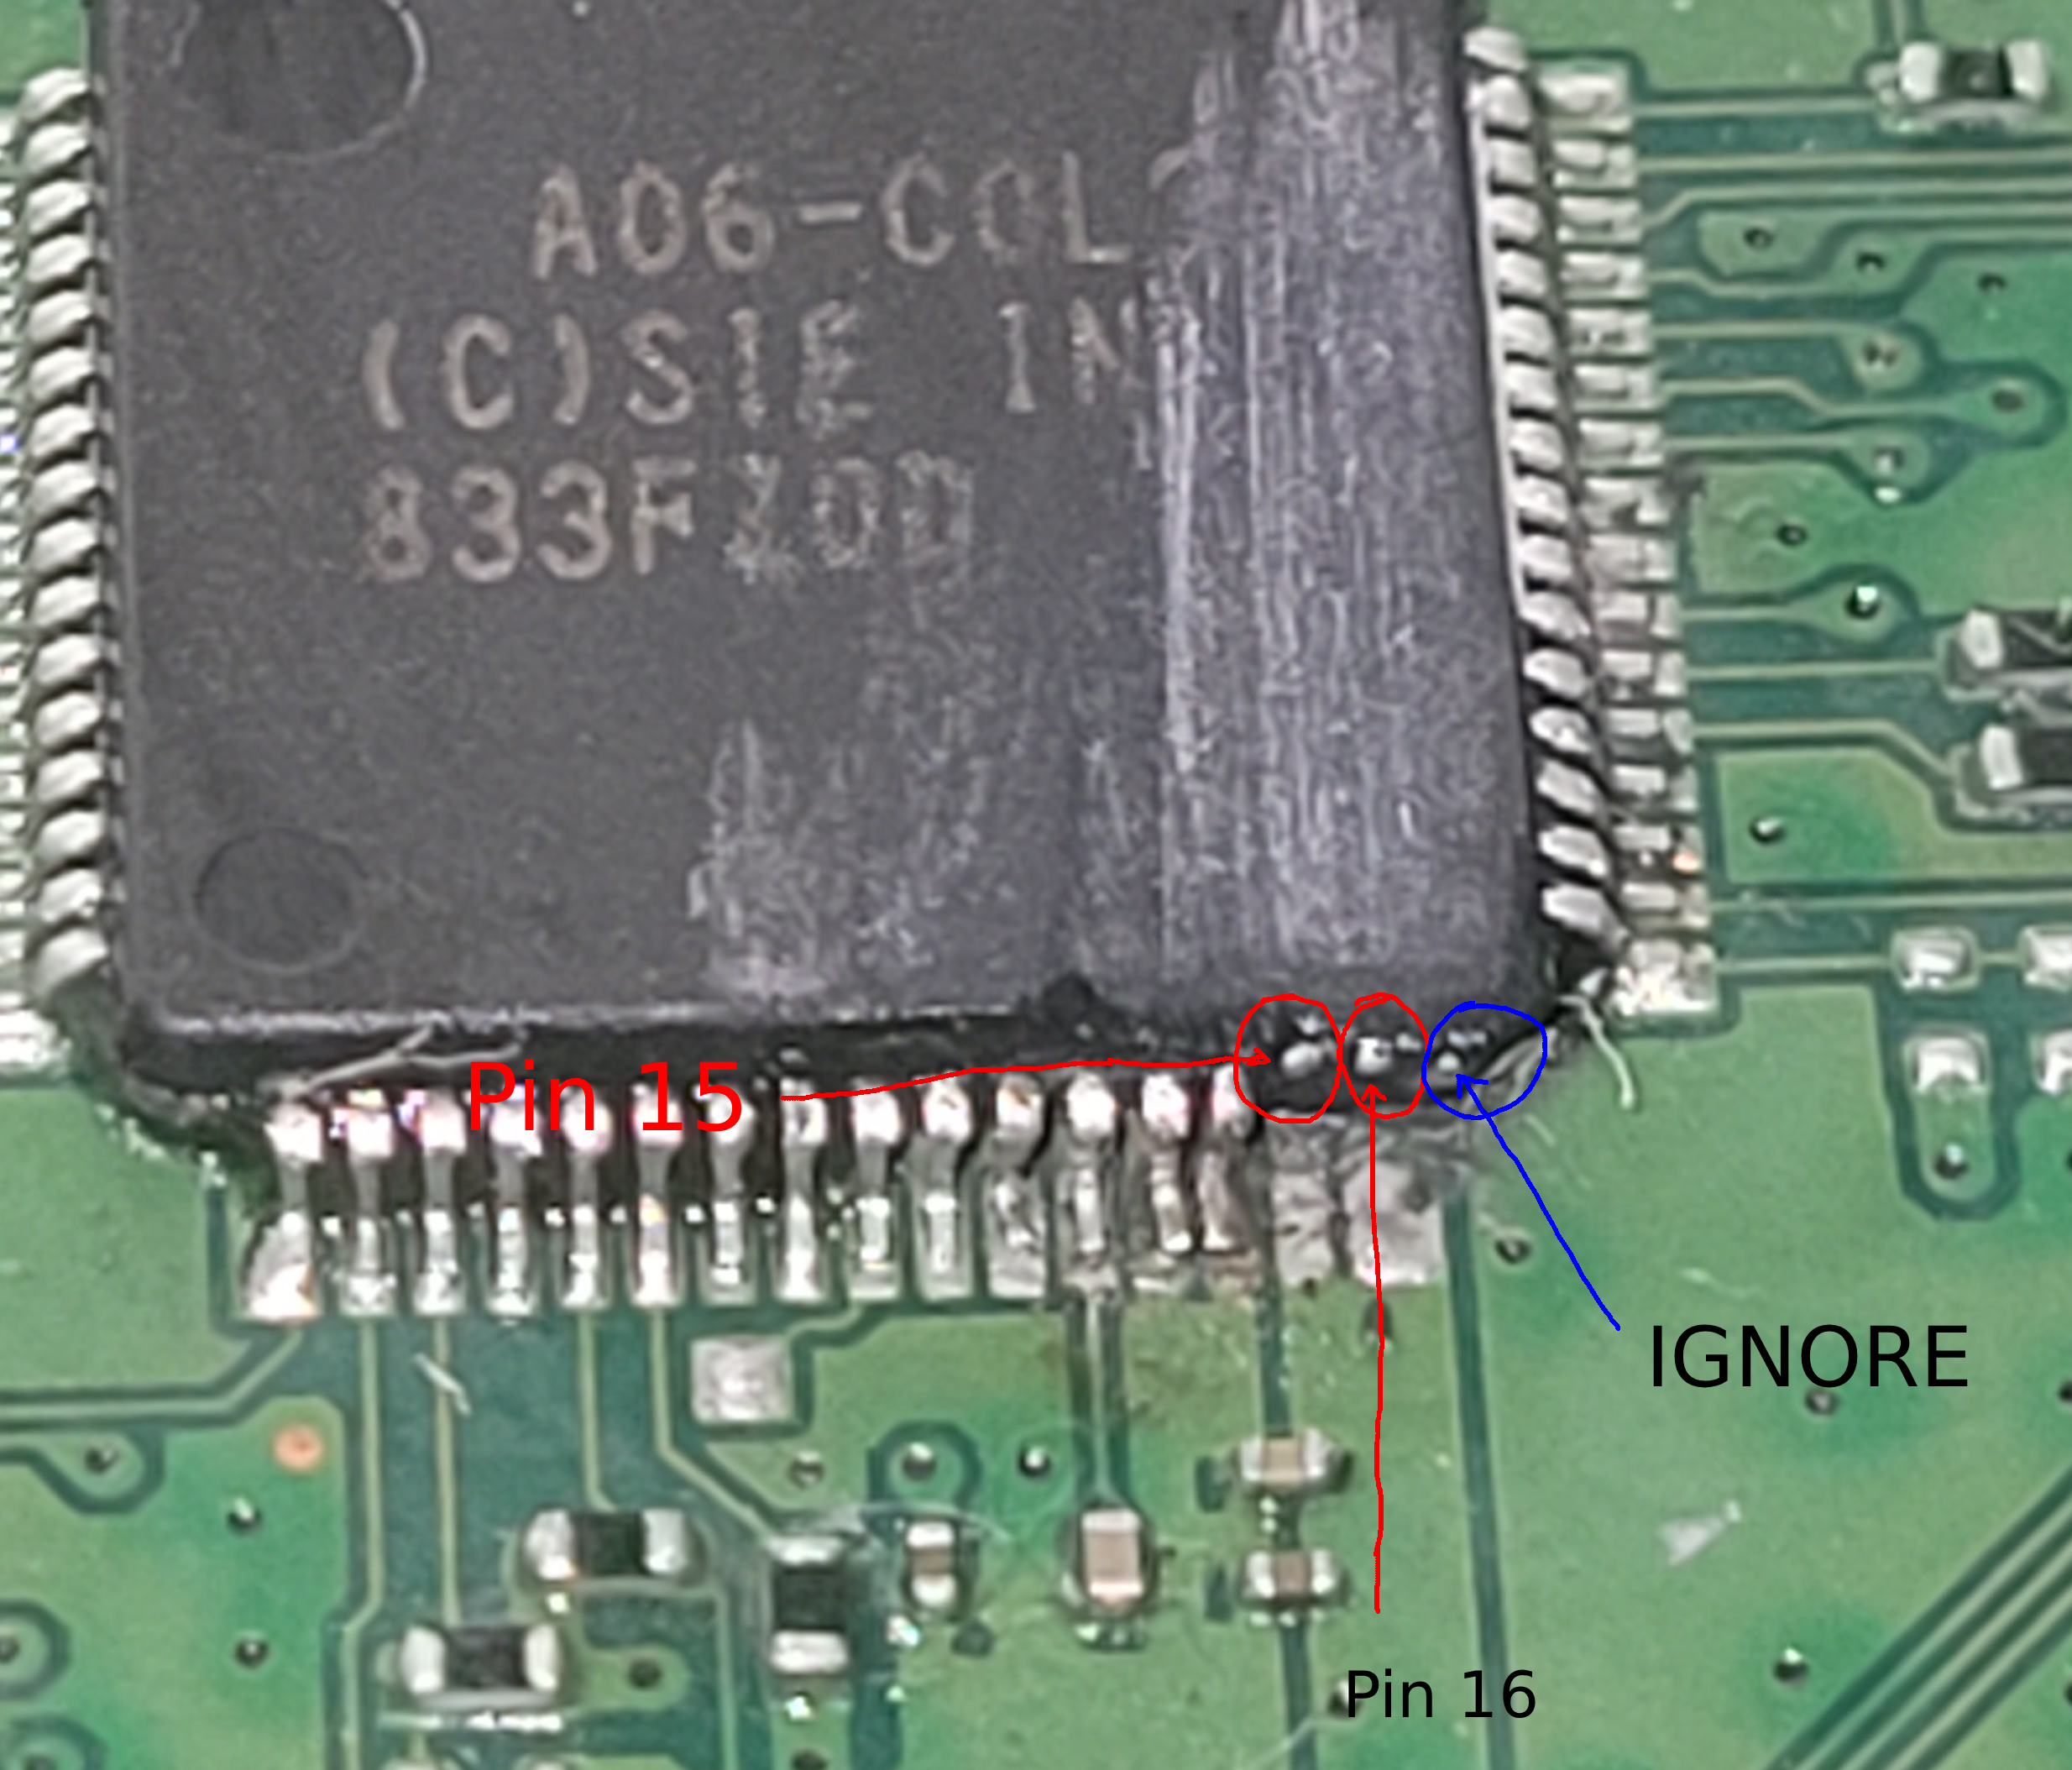
This takes absolutely FOREVER to do, taking me about an hour just to get to the copper of the 2 pins i took off, and you need to go deep but not too deep. Try to go deeper nearby where the pins used to be and shallower farther up where it’s not necessary. Once you get to the copper, there will be three pins, ignore the right most one since it’s an unused one. If you do your soldering correctly and you don’t break the syscon even more trying to do this, your console should be fine. It makes it a little bit harder to solder to those pins when you’re trying to activate debug or flash to the syscon, but it worked fine for me.
While we’re on the subject of the syscon, you don’t have to solder directly to the pins, there are alternative solder points you can use, both from that reddit post and in modded warfare’s video.
Soldering to the NOR
Thankfully, I didn’t have as much problems soldering to the NOR as I did the syscon. If you have an older model PS4, you will have a bigger NOR that has exposed legs like the Syscon you can easily solder to, but every other model has a much smaller NOR with very small legs that are hard to solder to. I ended up using a breakout board that came with the kit of the CH341A that I bought, soldering magnet wire to the pads next to the pins labeled 1-8, then soldered those wires directly to the NOR legs with a fine tip iron. Orientation is important, so make sure when you’re soldering to pin 1 on the smaller NORs the engraving on the chip is upright and readable as intended, pin 1 will be the top left most pin of the text in that orientation, and pin 5 will be the bottom right pin. You can see a diagram of the different NORs in the Wee Tools assets folder, in the spiway folder. The image below is my final soldering, it’s not the best quality soldering (or image LOL) but it got the job done. You might need a 1.8v adapter to flash the NOR, it was working fine for me when I was flashing it at first without one since it took some time to get one but your mileage may vary.
.png)
Flashing the NOR and Syscon
I don’t have anything to share in particular about this process, just follow the ConsoleMods wiki guide and Modded Warfare’s video, you’ll be fine. Mainly just remember you need to do things to the NOR first, then Syscon. In Wee Tools when you’re patching the Syscon, make sure to type the numbers next to the options instead of the letter it gives you, or else you’ll be extremely confused when it doesn’t patch your file. Also be sure to Rebuild Syscon SNVS (read the consolemods wiki guide!!!) at the end to avoid CE-40947-4. You’re most likely going to end up having to flash the NOR and the Syscon multiple times, testing each slot switch or if you know how to do the CoreOS method you can do that too. Just remember to reflash Syscon each time you have to try another slot switch.
Conclusion
Again, this isn’t a very concise guide so please be sure to ask for help in the PS4Mods subreddit or the Playstation Homebrew discord if you need it. Feel free to ask me questions on my guestbook or any other place you can reach me as well! Thanks for reading my first guide!